Be the first to know — Get Outpost's monthly newsletter for news, tips and job opportunities.
Ideas
14 Pro Tips and Tricks for Maya
16 September 2022
Shorten your Maya workflow with these 14 tips and tricks from our seasoned artists around the globe
Many of our artists across all studios utilise Maya in their day-to-day, picking up many useful tips, tricks and quirks of the software, enabling them to work quickly and efficiently in this vast software. We asked a number of them to reveal their most useful and well-used tips in this article so you can improve your workflow and Maya knowledge.
Thank you to Mid CG Generalist Christian Wells, Lead Generalist Nick White, Lighter Cynthia Soza, and Lead 3D Artist Daniel Kumiega for sharing their wealth of knowledge for this article.
01. 'Use Constraints' to select multiple edges on a mesh
This will save you a lot of time! Manually selecting multiple edges on a mesh can be very tedious, especially when the mesh has loads of edges that you need to perform an action on. In the ‘select’ menu there is an option to ‘use constraints’. This will allow you to select all components that fit a defined parameter, based on length, geometry, angle and more. This will stop you having to go through and individually select each one.
02. Utilise Maya’s basic sculpting tools
Maya isn’t the strongest software for sculpting, but it does have some very basic sculpting tools you can use to add some variation to repetitive objects such as tiles, panels, bricks, etc.
03. Work from low poly to high poly
Always build a proxy model first. It means you can block out your model and check your proportions and scale. If you have a low poly model, it’s easier to make big changes when you get feedback. It also provides you with a blueprint to model from.
04. Turn on ‘face centres’ to ensure smooth unwrapping
When modelling, if the mesh isn’t smoothing correctly, or if the UVs won’t unwrap in a predictable way, it could be that you have extra hidden faces that you can’t see. To fix this, enable ‘face centres’ in preferences > selection. This will put a small dot in the middle of every face so any intersecting face can be easily spotted.
05. Always look at reference
Even if you’re given a concept, be sure to find references, or request references that the concept artist was using. You’ll find cool elements that you can incorporate that you may not have thought of.
06. Use the rename tool to shorten your workflow
It’s really important to keep the outliner tidy with clear naming conventions for every object. This will make it easier for you or anyone else who picks up your scene to find something. The more objects you have, the more vital it is, however the more tedious it becomes if you’ve not been naming as you go. Luckily at the top of the UI there is a box that can be set to ‘rename’. Whatever is typed into here will rename every selected object accordingly.
07. Transfer your UVs for identical meshes
It’s always best practice to UV as you’re modelling, however from time to time you may have duplicates of objects that haven’t had their UVs nicely laid out. Luckily you can just unwrap one object and transfer its UV to the others, providing the meshes you’re transferring are exactly the same. To do this, click on ‘transfer attributes’ in the ‘mesh’ menu.
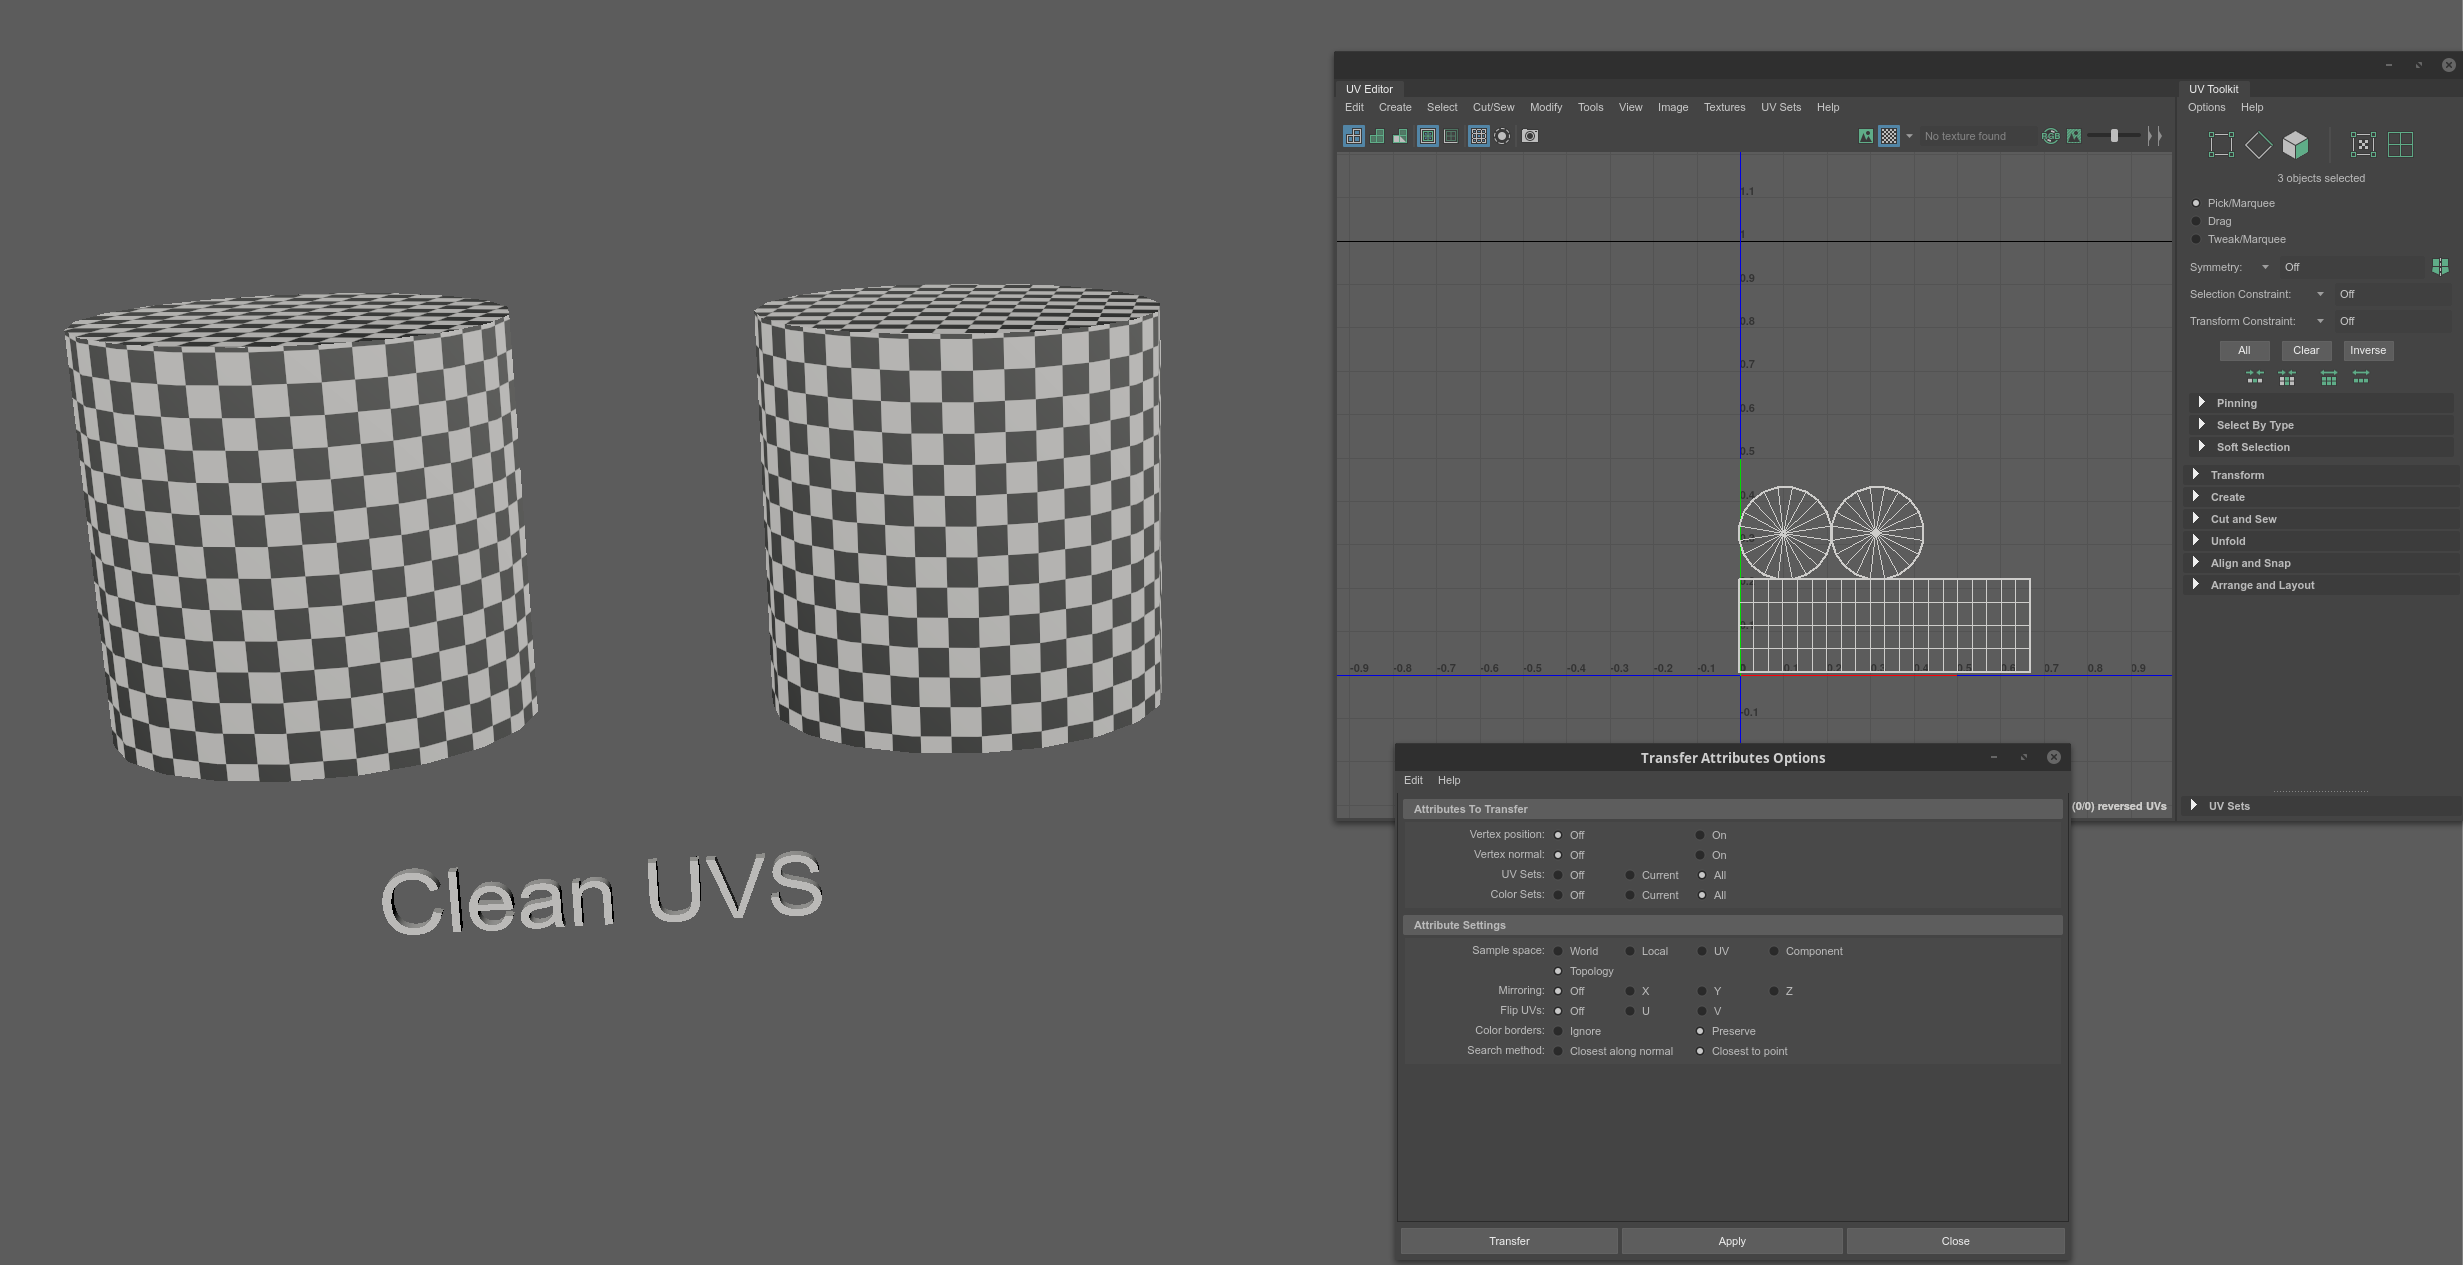
Use the 'transfer attributes' tool to UV your identical meshes
08. Keep scenes as simple and organised as possible
One of the most important things you can do to allow yourself the room to take your project to the next level is keep your scenes organised. Here are a few ways to do this:
08a. Give things easy, obvious names and group things together that go together
It may sound basic but descriptive naming on nodes and groups can really help you and others to understand the scene, especially if you don’t interact with it for a while.
08b. Remove namespaces that aren’t important
Namespace prefixes can get a little out of control if you have big scenes and objects that are being brought together from multiple artists. Sometimes consider changing the namespace options on the import settings to not include or use a shorter namespace prefix. This way the object’s names start out cleaner and might not need to be renamed.
08c. Clean as you go
Regularly remove old items used for construction that are not needed. If it’s not actively useful in the scene, delete it. Once the scene gets really busy with things it’s hard to tell what is useful and what is not.
08d. Delete construction history on geo
Construction history can get messy and create instability of the scene. In general, try to keep your geometry clean. Messy, bad geo creates a lot of headaches down the line.
08e. Work on individual components in their own scene
Work on components such as cameras, assets and layouts in their own scene, referencing them to the main scene. This will create an easier trail to figure out where things came from and offers an easier way to update them if needed. It will also keep your main lighting scene file a lot smaller, resulting in quicker saves and faster scene loading too.
09. Join your objects together quickly and accurately with ‘snap together’
Sometimes you need an object to sit directly on the surface of another object. You can do this by eye by dragging the pivot point and trying to line it up as best as possible, or you can use the ‘snap together’ tool found in the ‘modify’ menu. This will snap any mesh (clicked first) directly to the surface of the second mesh (clicked second) and is a much faster, accurate way of working.
10. Use Duplicate Special to easily replicate multiple elements or shapes
Modelling replicate elements or shapes can be made very simple by using ‘duplicate special’ under the edit menu. Here you can specify the number of copies, as well as the offset values for X, Y, and Z. You can also position, scale and rotate the objects in this window.
11. UV as you go
Maya has a linear workflow, so UV your models while they are lo res. That way you’ll have all of the seams cut when you have your final detailed model and it will just be a case of unfolding and packing. Also, keep you UV shells to the same texture scale, it makes it easier to texture a model and bear in mind if any shells need to be oriented in a particular direction for things like brick or wood.
12. Always check your normals
It’s a good idea to have single sided on in the viewport so you can see any reversed normals.
13. Render in lo res
Render in lo res with lo samples in Arnold while you are setting up your lights, then up the samples for your final render.
14. Hotkeys are your friends
Speed up your workflow by utilising Maya’s hotkeys. You can view all of Maya’s preset hotkey shortcuts here, or you can customise your hotkeys for your most used actions by following this tutorial by Autodesk.