Be the first to know — Get Outpost's monthly newsletter for news, tips and job opportunities.
Ideas
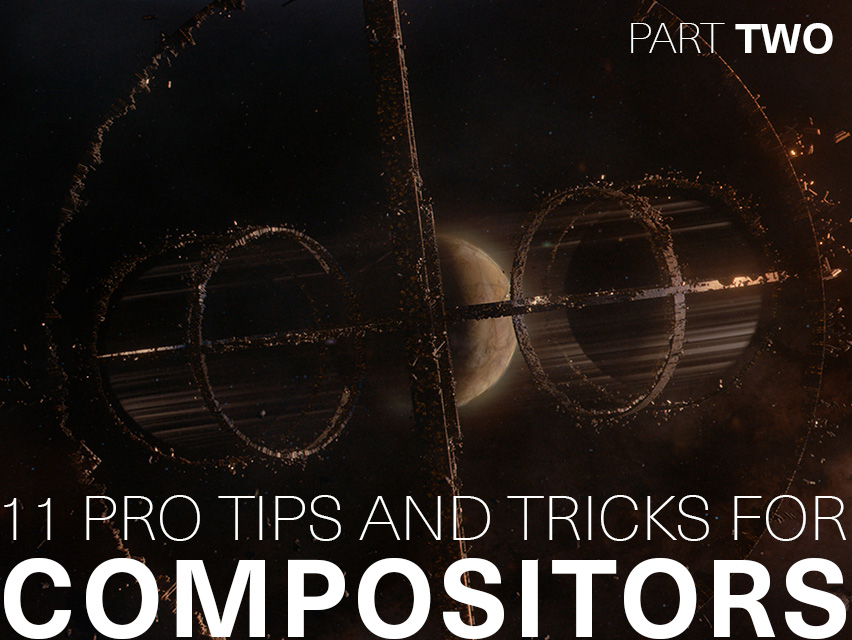
11 Pro Tips and Tricks for Compositors: Part II
3 November 2022
We're back with another 11 pro tips from our experienced resident compositors
Missed part one? Don't panic, you can find even more Nuke magic here in our previous post.
Thank you to 2D Supervisor Geoff Wigmore, Senior Compositor Dhirendra Singh, Mid Compositing Artist Victor Manuel Enriquez Diaz, Compositors Donna Camargo and Andrea Hernandez for sharing their Nuke secrets!
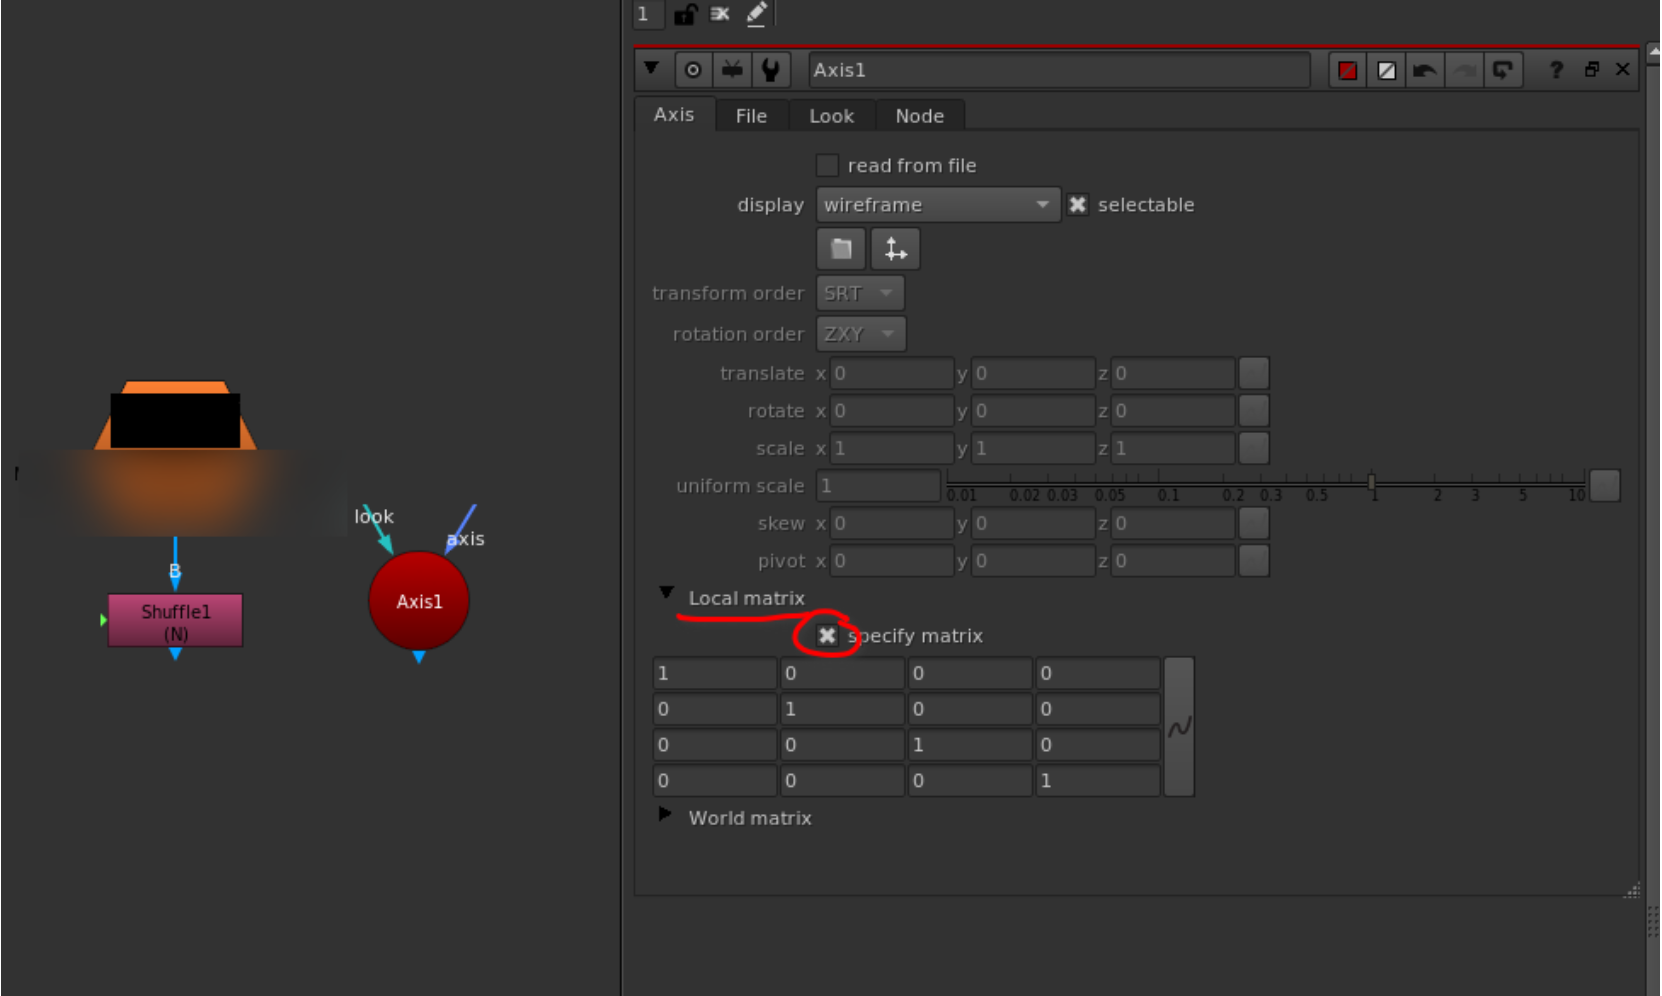
01. Create your own mattes using Normals
Sometimes you will need a very specific matte that isn’t available in the AOV’s for a 3D element. You can use this method to create your own mattes, which can be used for a variety of things from “light mattes” to masks.
You will need a Normals pass, a 3D axis node and a colour matrix node. First use a Shuffle node to shuffle the Normals into the rgb.
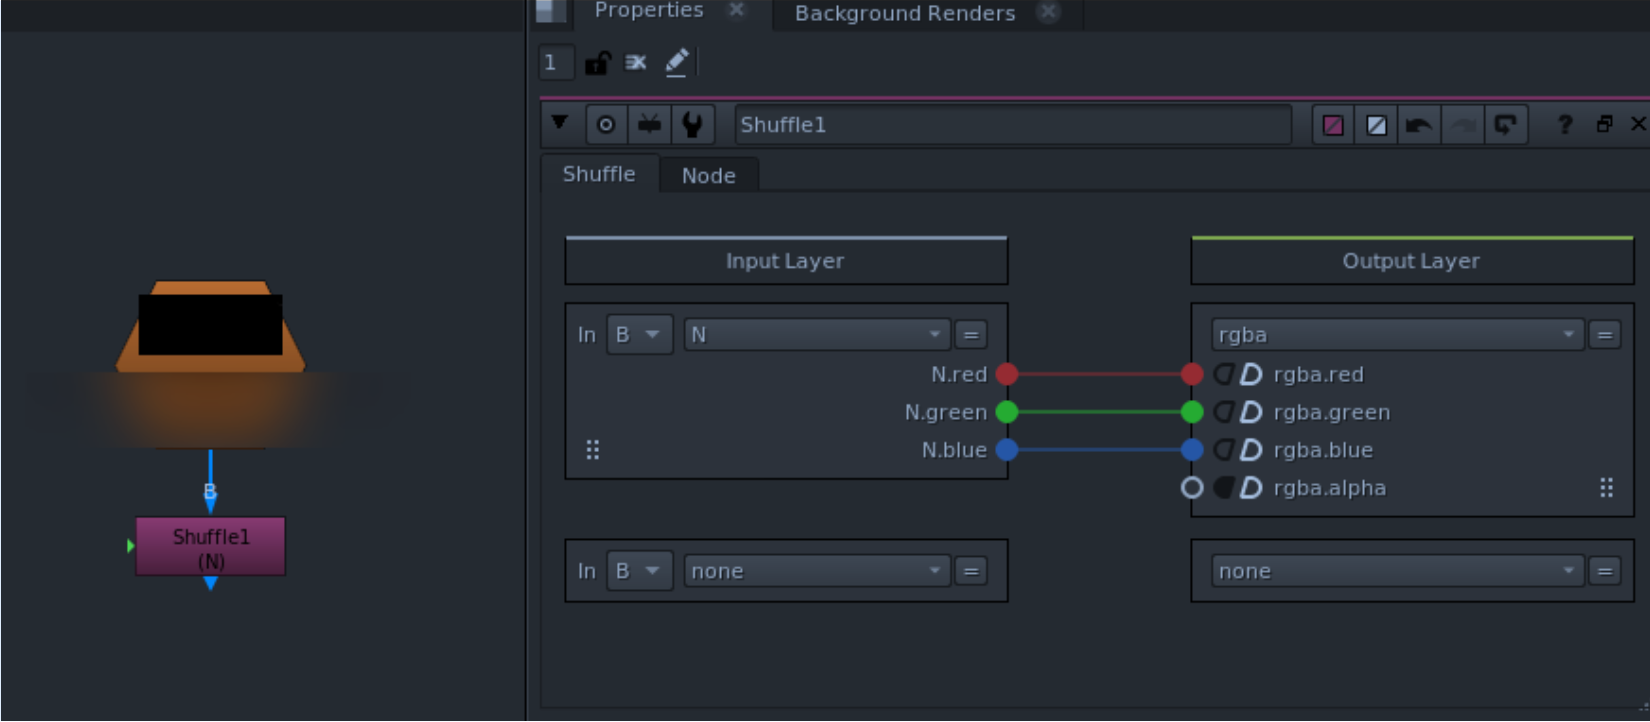
You will need an axis node next. Toggle down the “local matrix” arrow and select”specify matrix”.
Now add a colour matrix node and link it to the axis node to it so that it will drive the color matrix like so:
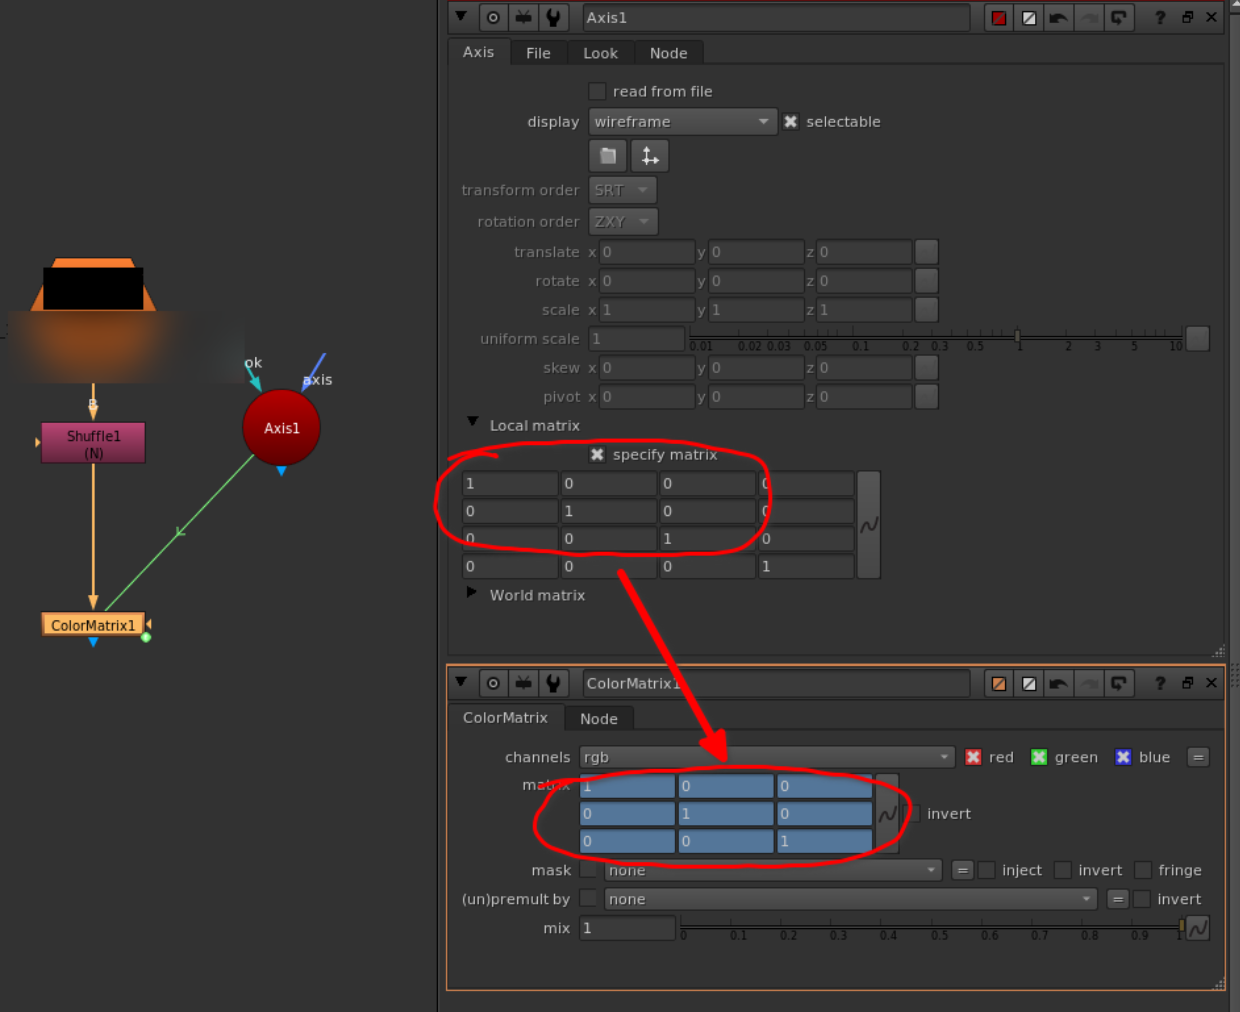
One by one, link the top left 3 rows and column to the corresponding places in the color matrix node. Toggle up/close the “local matrix” tab. You will now be able to rotate the normals in their x, y and z axes, and when viewed in the R, G, and B channels you can find just the right angle “light matte” or mask that you may need!
02. Don't be scared of TCL expressions
TCL Expressions are code we use to control or affect any parameter, like the $GUI we mentioned in our last Tips and Tricks for Compositors.
To access them, right click on any parameter from a node, select "add expression" from the displayed menu and write your code in the text box that appears.
One of the most basic and useful expression is "frame" This will automatically give you the value of the frame you are at (1001,1002,1003,etc.), which you can also affect by adding, substracting, multiplying or dividing by another number.
For example, on the Z parameter of a Noise node, if you write "frame/40" you can use this to drive the animation of the noise through the duration of the shot automatically. You can even make it go faster dividing by a bigger number or slower by a smaller number. From there you can expand on this by creating a new variable for driving the division number, and suddenly you have the basic blocks for a new tool that can later be saved and shared.
Learning this can be a bit daunting specially if you don't know anything about programming; Attila Gasparetz has a useful blog that's full of resources and tutorials where he explains step by step what he is doing and how you can use TCL on a day to day as a compositor.
03. Some useful TCL scripts
These are some useful TCL scripts you can learn that will help you to speed up your workflow:
Getting a knob’s value of a specific node:
[value Read1.first]
First frame of current read/write:
[value this.first_frame]
Name of the input node:
[value this.input.name]
Name of the node before the group (Outside):
[value this.parent.input.name]
Return 1 if the node is on error otherwise 0:
[value error]
Get the x position of the point #3 of the Bezier1 of the Roto1 node:
[value Roto1.curves.Bezier1.curve_points.3.main.x]
Get the value of the channel of a node, at a specific pixelcoordinates (e.g.: 10,10):
[sample [node input] red 10 10]]
Relative to script location file path:
[file dirname [value root.name]]
Filename only:
[basename [value [topnode].file ]]
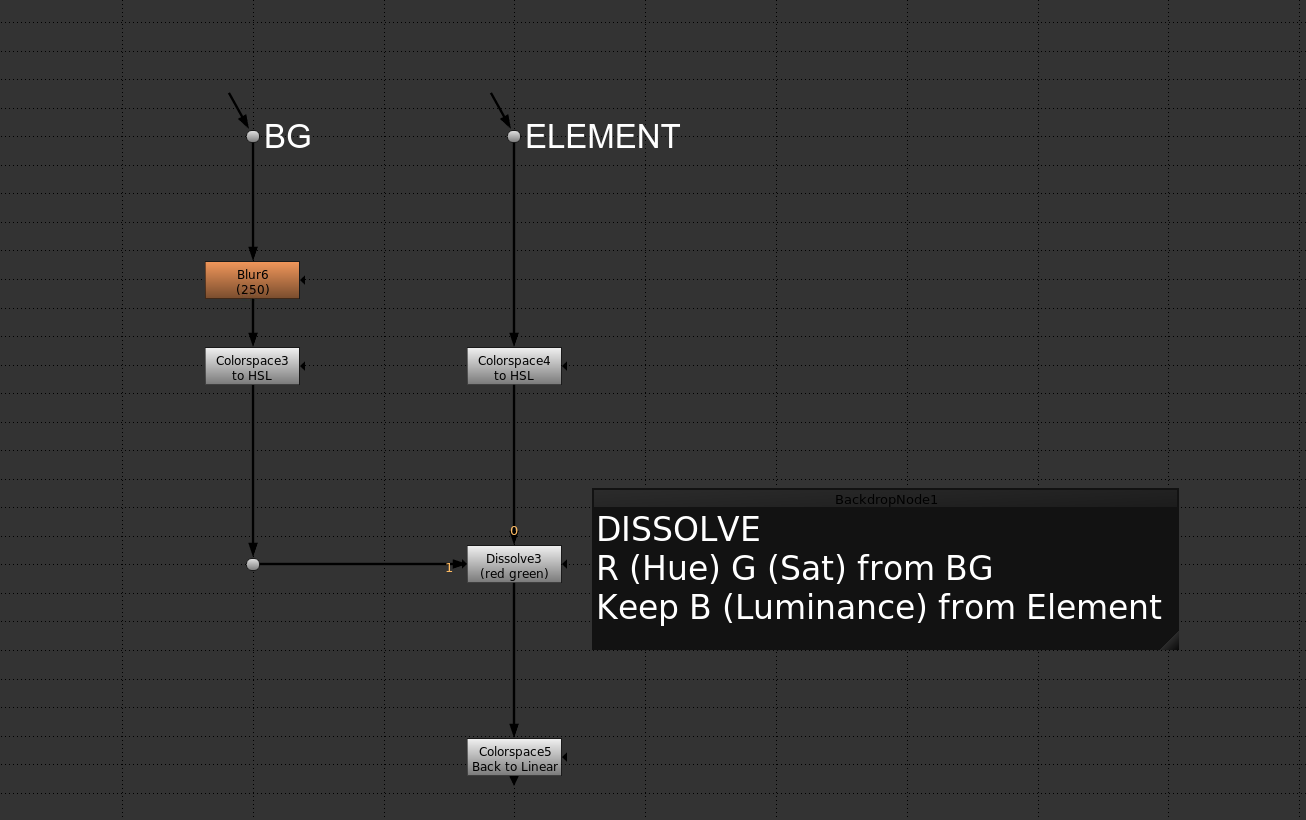
04. Colour match your elements to the plate with ease
A great technique for colour matching elements like smoke or atmosphere to the BG plate is to mix in the hue and saturation from the BG plate while keeping the luminance from the element. This can avoid tricky colour matching issues that come from grading transparent elements or just to give an element a bit of the BG colour without losing its characteristics or features.
Do this by switching the colourspace of a blurred BG and the element to HSL (Hue, Saturation, Luminance). Then dissolve in the Red and Green channels, while leaving the Blue channel from the Element. Then switch back from HSL colourspace to the project colourspace.
05. Future-proof your scripts by keeping order
Having a clean script will not only make your general work smoother and your tech checks faster; If things change unexpectedly, like additional layers of elements required or unexpected request for DI mattes for example, wont break your workflow. For Stereo shows it makes things easier to have identified a clean way to do a basic A+B mini comp where you can pre comp each elements in individual layers without having to redo everything from scratch. Additionally if your shot gets reassigned the new compositor doesn't have to untangle spiderwebs to figure out the fixes needed.
06. Check your elements before you start building
When building your shot for the first time make sure you have all the elements you need, your shot and elements are at the correct resolution and that they are the correct length, and if your shot has any retime or repo applied to it. If you are missing frames or passes you think you might need flag it as early as possible to your comp supervisor or to the artist working on that shot. The earlier the better.
07. Be specific in your submission notes
When writing your submission notes, be as specific as possible, sometimes because of deadlines, client meeting or absences, feedback has to be offline so it helps the supervisor know what you updated in that version, what you are still working on and what elements you are using if you have cg on your shot. This way you will get notes that help you move forward on your comp.
08. Tidy up your Nuke script using Autoplace
Working with large scripts can get messy, fast. A quick and easy shortcut to help you keep your nodes in order is the ‘L’ key. Highlight the nodes you’d like to tidy and press ‘L’, this will align all of your nodes in a neat line. Alternatively, navigate to ‘Autoplace’ by going to Edit > Node > Autoplace.
09. Keep learning
Always continue increasing your Nuke knowledge. No matter how long you’ve been using the software, you won’t ever know it all. Be sure to frequently visit resources such as Foundry’s User and Reference Guides to learn new tips and tricks, and work collaboratively with your team… Most people will know something that you don’t. Also, always read the release notes in new Nuke updates, you’ll be surprised to find some useful tips in there for the latest updates.
10. Learn your matte extraction expressions
Memorising these will help you speed up your workflow.
• Magenta (b∗r)-g
• Yellow (r∗g)-b
• Green g-(b+r)
• Blue b-(r+g)
• Red r-(g+b)
• White r∗g∗b
11. Don't be afraid to ask questions
If you are having trouble figuring out something, reach out to your team. They might have a shot similar to yours or in a previous project done something similar that could help you.


